This is a technique I use a lot. It involves combining paint colors to give a gradient, or subtle shift, in color across a canvas or paper. Here are some examples of where I have used this technique:
A corner-to-corner, multi-color gradient: A top-to-bottom, one color (multi tone) gradient:
 A couple of things to note before we get started.
You don't have to stick with one color, but try to stay on one side of the color wheel. If you try to grade colors on the opposite sides of the color wheel (think purple and yellow) you'll get brown. If you stay with colors that are connected on the color wheel, you'll get a nice shift in tone. In the first picture above I used yellow, orange, and red. In the third, I used yellow, orange, and two different shades of brown.
If you're going to try the technique on paper, you'll need to seal it first, or else the paper will soak up the paint before you can get a nice blend. A single coat of mod-podge is all you need to seal the paper. Just let it dry thoroughly before painting or your paint will crackle (which is another cool technique).
If you are using thick paints (think Ranger's paint daubbers) you'll want to add a little water to your paints first, or else they dry to quickly to get a good blend. Just try to get the paint to the consistency of everyday craft acrylic paint and you should be fine.
I use foam brushes to apply the paint and do the first rough blend (the fat side of a 1-inch foam brush works really well for blending) and drug store makeup sponges and foam brushes to do some of the finer blending.
I usually end up using one foam brush for each color of paint (light, medium, dark) and one for each color transition zone (light/medium, medium/dark). So make sure you have enough brushes before you start.
As the paints get darker in color/tone, use less. Dark color paints will quickly overpower your gradient. In general, I try to work from the lightest color to the darkest color. Sometimes that's not possible, like in the example I give, below.
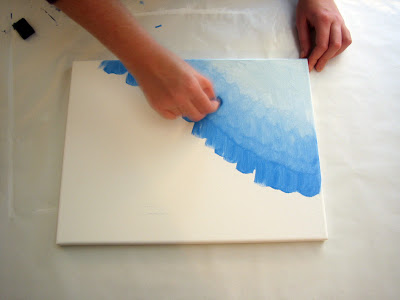
All right, here we go...I'm doing a one-color (multi-tone), corner to corner, double gradient for this example.
Layout all your paints and brushes/sponges before you get started. You have to work while the paint is wet, so the last thing you want to do is have to run after something. Go ahead and thin your paints with water, if desired, at this stage as well.


 Repeat the blending process all the way back to the lightest color. Start by pulling the darkest paint into the white space. Then start blending the dark color into the medium color/light color blend.
 In this case, since I am doing a double, corner-to-corner gradient, I am leaving some of the dark colored paint unblended for the next step.
 Now I'm going to blend from dark to light in the opposite corner. The technique is the same. First, lay down the medium color with a little white space between it and the dark color.
 Blend as above, pulling the dark color into the white space first and then blending with the medium color.
 Then add the light color and blend as above.
 Keep blending while the paint is wet. As the paint dries, you start to get interesting effects as you blend. Keep working the paint until you're happy with it. Once you're done, use your paint-loaded brushes to paint the edges of the canvas in similar tones to the canvas.
 Here's my finished canvas!
 Give my hubby a hand for taking the photos for this technique, or else I'd have one paint covered camera! Happy Wednesday!


10 comments:
Hey Veronica. As long as you seal the paper first, Mod Podge being the easiest way, you can use any background paper. The only thing to keep in mind is that the thinner the paper, the more it will curl when you Mod Podge it. But you can always Mod Podge the other side to get the paper to flatten back out. Thanks for asking!
Great tut, look nice too =) Thank you
But who was canvas?
Probably a stupid question but can you still paint another picture on the canvas using this technique? will the colours be off ?
This is EXACTLY what I was looking for! Your steps are great and so easy to understand. I'm bookmarkign this page when I'm ready to do my gradient in the next few days.
Thank you SO MUCH for taking the time to share your expertise! This is exactly what I needed, and it will make all the difference in my decoupage projects. Thanks again!
Thanx!
i can now teach my students this technique!!!
Just a friendly reminder. Per standard copyright laws you can not teach any of the thechniques or projects presented on this blog without my permission. Just ask. I appreciate your attention to this matter.
Thanks for the awesome tutorial! I featured it on my blog! http://lillianpearl.blogspot.com/2011/04/shrinky-dink-minus-sharpie-tutorial.html
I found a beautiful gradient scrapbook paper I want to recreate on a wall. I'm crazy,p to try this cpbecause I'm not a painter, but willing to try. What kind of paint would I use for such a big project? I usually prefer an eggshell latex finish, but don't know if that would blend well.
Post a Comment