


...when you are bombarded by too many outsider opinions on your life... ...a little artistic mutiny.
Friday, March 27, 2009
This is what happens....
What a Deal!
I had been looking for a new way to store my wood mounted rubber stamps. I've shown you how I store my clear mounted stamps, here. But, I was never really happy with my wood mounted stamp storage. If you look at the first photo of the clear stamp storage post, shown here: You can partially see my old wood stamp storage method, about halfway up the left hand bookshelf. I had simply stored them in plastic tubs. Which worked, but there were two problems. (1) I cannibalized those plastic storage tubs for another storage need and (2) look at how much wasted space there was between the tubs, they were simply the wrong size.
So, I've been looking for another method for a while now. Hopefully, a method that would fit that same space. I tried some of the ITSO containers from Target, wrong size. I look at baskets, just not my style. I've looked at other plastic tubs, same wasted space issue. I've looked at other repurposed containers, most were too tall. I've been browsing around for months.
Then, last Sunday, I was in Micheal's trying to buy the only Tim Holtz stamp set I was still missing. I wasn't looking for anything else. But I just happened by a center aisle product setup for clearanced paper board alphabet letters that were about 8 inches tall. Each individual letter was displayed in one of these: Picture a light bulb over my head.
I measured them and I would be able to fit 6 across on my shelf with little wasted space. They were not too tall. They tapered from front to back so my stamps would be visible from the front. They were just about a perfect length. They were also made of very sturdy paper board, which would be sturdy enough for long term storage, but also could be easily painted, stamped, or paper covered to make them look nice.
But they weren't for sale.
They were a display method for the paper board letters, they weren't product themselves. So my husband talked to the manager. Since they were just going to throw them away, she said we could have any of them that were empty for free. Well, we found six empty ones and took them home.
Here's what they look like. I'm still planning to paint them, and then probably stamp on them with the stamps that they are holding, as a kind of combination labeling-decorating technique:
 They're actaully long enough to hold my 12-inch stamps with room to spare:

 What a deal!
Thursday, March 26, 2009
Tuesday, March 24, 2009
Canvas Art Journal Page
 May you never see fulfillment of all your dreams.
All I can say is I'm glad I looked up the correct spelling up "fulfillment" before I put it down in paint.


Saturday, March 21, 2009
Make Your Own Canvas Art Journal
I decided I wanted to make my own art journal, but instead of an art journal made of paper, I decided to bind one out of canvas. It's really easy to do and I love the results. Especially the rough edges. Remember, you can click on the photos below to view larger, more detailed versions.
Step 1 - Cut your canvas pages. I wanted 9x9 pages so I cut mine to 10x10.5 (this will give you 1/2 inch margins on three sides and a 1 inch margin on the side you will be binding). You will need two pieces for each page. I cut 14 pieces for 7 pages.
Note: Canvas is also known as Duck cloth when you go looking for it at the fabric store. I just used natural color canvas, but it's available in a range of colors, including white. Step 2 (optional) - Iron your canvas pieces. Iron your canvas pieces if you want to remove the fold lines from the fabric. If you like the fold lines, leave 'em. Use the highest setting on your iron.
Step 3 - Sew your pages. Ok, don't freak out on me, we're talking very simple sewing here. Just make sure you are using a high gauge needle (one meant for denim, for example). I used a 100/16.
We'll be sewing two pieces of canvas together to make each page. Doubling up the canvas provides stability to the pages. Before you start sewing, you'll need to temporarily join each pair of pieces together. The "normal" way to do this is with pins, but stick pins and I have never gotten along, so I just used a bit of adhesive runner in all four corners. Worked perfectly. As I mentioned above, I sewed a 1/2 inch margin an three sides (upper, right, and lower, as shown below) and both a 1/2 inch and a 1 inch margin on the remaining side (left, as shown below). I sewed two lines on the binding side of the page just to provide a little more stability to the binding.
 Step 4 - Gesso your pages. Gesso provides a painting surface on the canvass. Without gesso, your paint will soak immediately into the canvas and be difficult to work with.
 Apply gesso to one side of each page. Allow to dry for at least an hour and then gesso the other side of each page. I used transparent gesso by Liquitex because I wanted to maintain the natural color of the canvas. However, if you want to work on a white background, white gesso would work as well.
Note: the canvas will shrink slightly after being gessoed. This means that the un-gessoed side of your page will wrinkle. I promise, the pages will flatten back out again after both sides have been gessoed and dried.

 Step 5 (optional) - Iron your pages. Two of my seven pages had wrinkles after gessoing, so I chose to iron them once the gesso was dry.
Note: This step doesn't smell too great.
 Step 6 - Add grommets. I used We Are Memory Keepers grommlets for the Crop-a-dile Big Bite. Although the grommlets are supposed to be able to be set without punching a hole first, I found that's not necessarily true when you are setting the grommlet through two layers of canvas. I traced the inside of the grommlet onto my canvas and then used the Crop-A-dile to punch a hole just slightly smaller than the grommlet before setting the grommlet.
 Step 7 - Bind. I bound my canvas art journal with twill ribbon. What's great about this binding method is:
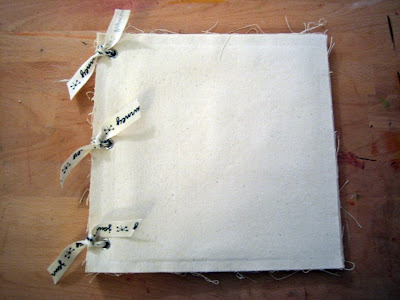

 I hope to start painting in my new canvas art journal soon, keep an eye out!
 Step 6 - Add grommets. I used We Are Memory Keepers grommlets for the Crop-a-dile Big Bite. Although the grommlets are supposed to be able to be set without punching a hole first, I found that's not necessarily true when you are setting the grommlet through two layers of canvas. I traced the inside of the grommlet onto my canvas and then used the Crop-A-dile to punch a hole just slightly smaller than the grommlet before setting the grommlet.
 Step 7 - Bind. I bound my canvas art journal with twill ribbon. What's great about this binding method is:
- you can add additional pages, if desired.
- you can remove pages to paint on them, if desired.
- the pages turn like those in a book, which is a really nice look.


 I hope to start painting in my new canvas art journal soon, keep an eye out!
PAD 3-20-09
 You know you've become obsessed with those scrapbooking-deal-a-day sites when you have two separate shipments arrive on the same day.
PAD 3-19-09
 I've mentioned before that I'm allergic to wheat. Well, the best wheat-free bread I've found is actually one that needs to be made at home, instead of purchased pre-made. So it's become a once-a-week ritual to make two loaves of gluten-free bread. Unfortunately, gluten-free bread doesn't keep very well. We've discovered that toasting it right away, to drive off the moisture, and then freezing it works pretty well. So between the mixing, rising, baking, cooling, toasting, cooling, and freezing, it almost takes all day.
Wednesday, March 18, 2009
PAD 3-18-09
 An open window....Here in Florida we have a tendency to hide in the air conditioning, even when it's not necessarily HOT, just MUGGY. Well, today I'm rebelling.
PAD 3-17-09
 How much water do you drink a day? My dermatologist asked me this recently, so I started keeping track. I actually drink a GALLON of water a day.


Monday, March 16, 2009
What I Did Yesterday
So, we went to Titusville, FL yesterday, along with about 3/4 of the population of Florida. Remember, you can click the photos to view larger versions.

 That's the Vehicle Assembly Building to the right.


 The dark beam was actually the shadow of the exhaust trail. The sun was reflecting off of the upper portions of the exhaust trail causing the orange glow.
 You can start seeing the shuttle in this photo, it's the white dot at the end of the exhaust trail.
 The two smaller white dots below the shuttle are the external boosters that are jettisoned about two minutes after launch.
 The shuttle is the white dot just over the left side of the palm tree.
 And here's a view of the crowd.
 Totally worth doing, once.
Saturday, March 14, 2009
PAD 3-14-09
I drive a 12 year-old car, a 1997 Honda Civic. Today, it saw its last service. A $500 oxygen sensor replacement. We've decided it's not worth fixing after this, so we went car shopping. I think I'll be getting a brand new 2009 Toyota RAV4 in the next 6 months....
Friday, March 13, 2009
PAD 3-7-09 through 3-13-09
Sorry for the combined post, you know how it goes...life gets in the way.
3/13/09 - Just finished reading these books. If you are a science fiction fan like me, they are both good reads. But like any series, the early Pern novels are the best ones. Stardust is aimed at teens, so it's a nice light read. 3/12/09 - I've been having problems sleeping at night, so mid-afternoon naps have become a mainstay.
 3/11/09 - My hubby, studying for his second Discrete Mathematics test (he did really well on it).
 3/10/09 - Right now I'm re-playing Luigi's Mansion on the Wii.
 3/9/09 - The eternal search for the otter. We know some people who have spotted, and have photographic evidence of, an otter in this pond near our apartment. We keep dropping by but have yet to spot him.
 3/8/09 - We spotted a pair (male and female) of wild peacocks just outside of a park near our apartment. I wasn't able to get a great photo, but just seeing them was amazing. The male is on the roof in the right side of the photo, the female is on the ground in the left side of the photo.
 3/7/09 - Just finished reading this series. It's a decent series if you like fantasy. But be aware, the last book in the series isn't out yet.
Thursday, March 12, 2009
I promise...
...I'm not dead, I've not been kidnapped, I've have not lost my internet connection....
...I've just had a horrendous week at work, many deadlines on many projects, late nights every night...
...I hope to get back to regular posting this weekend.
Wednesday, March 11, 2009
Welcome!
Welcome Veronica!
Veronica has been around the blog for a while, but has just started "following" so I wanted to give her a shout out.
Thanks for all the wonderful comments you leave!
Monday, March 9, 2009
One Little Word - How's it Going?
So, how is your focus on "one little word" for 2009 going now that we're a few months in?
If you haven't heard of the "one little word" initiative, see Ali Edwards post here. Basically, the idea is to choose one word to focus on for the year. Sort of like a resolution, but more fluid, more general, more forgiving.
My one little word for 2009 is "explore". For me it has two meanings: (1) explore the area in which I live and (2) explore the depths of my creativity.
I am planning to document my journey this year via my one little word, probably with a layout or a minibook. My hope is that I will have one event per month that addresses each aspect of my word. I know that I am likely to forget details over time, so I am keeping track of each "one little word" related event as I go.
So far, for 2009:
January:
I explored Alafia State Park. I took a mixed media painting class at the local Arts Center.
 February:
I took the Animal Adventure tour at Busch Gardens. I dabbled in making Home Decor items for other people.
 March (in progress):
I took Art Journaling 102, an online course. I know in the months to come I'm planning to attend The Scrapbook Expo in Orlando and take a few classes, attend a couple of classes Tim Holtz is giving locally, and maybe take another class at the local Arts Center. I am also planning to explore Devil's Millhopper in Gainesville, see a shuttle launch at the Cape, and see at least one Rays baseball game.
How's "One Little Word" going for you? If you haven't picked a word, it's not too late.
Subscribe to:
Posts (Atom)
