Saturday, January 31, 2009

January Technique 3 - Digital Embellishment Basics, Post 1

Remember, you can click on any of the photos for larger, more detail versions.

Digital embellishments can be purchased at a multitude of online stores. So far, I have purchased most of my digital embellishments at Designer Digitals, but have also purchased some from Two Peas in a Bucket and Scrap Artist.

Digital embellishments generally come in two types 1) PNG files or 2) ABR files. I will be talking about PNG files in this post in ABR files in the next post.

PNG files work like any other layer in PSE6. Open them by going to FILE -> OPEN -> browse to the location of the file -> OPEN.

Once open you can recolor, move, or resize your digital embellishment. These actions do not need to be completed in a specific order, you can move and resize your embellishment before you recolor it and vice versa.

Recoloring Embellishments


If the embellishment you purchased is available as both a PNG and ABR file, it is likely that the embellishment is black. To change the embellishment to white, go to ENHANCE -> ADJUST COLOR -> ADJUST HUE/SATURATION: Then adjust the "lightness" scale all the way to the right (+100): If you want your embellishment to be a shade of gray, choose any number between -100 and +100 on the lightness scale.

If you want your black embellishment to be a color other than a shade of gray, there are two ways to do this. The first way is to use the ABR version of the embellishment (see next technique post), the second is to use the PAINT BUCKET TOOL. If an ABR verion of the embellishment is available, I DO NOT recommend using the PAINT BUCKET TOOL to color your embellishment because you will lose some of the fine detail in your embellishment.

For example:

This is the original embellishment, notice the texture and varying opacity and shades of black within the embellishment:
And this is the embellishment colored with the PAINT BUCKET TOOL, notice how much of the texture is lost:
However, if you have an embellishment that does not include the variations in texture, opacity, and shade, such as this version of the same embellishment:the PAINT BUCKET TOOL will work well, here's how:

Select the color you want to color your embellishment by slecting on the FOREGROUND TOOL circled in the picture below. Then choose your color in the dialog box either by clicking on the desired color in the palette or entering RGB, HSB, or pantone values. Then select OK.

(You can also select your foreground color from a photo or another digital element by using the eye dropper tool.) Next, click on the PAINT BUCKET TOOL circled in the photo below. Then click on each part of your embellishment to color it. You may need to zoom into smaller portions of your embellishment to click on them.
To recolor a digital embellishment once you've moved it onto a digital layout or photo, just be sure the layer that the digital embellishment is on is selected in the layers palette on the bottom right hand side of the screen.

If you have a PNG file that is pre-colored, such as this one:you can adjust the colors by going to ENHANCE -> ADJUST COLOR -> ADJUST HUE/SATURATION and adjusting the HUE scale between -180 and +180, the SATURATION scale between -100 and 100, and the LIGHTNESS scale between -100 and +100:

Moving Digital Embellishments

Most likely you will want to move your embellishment onto a digital photo or layout. Simply choose the MOVE TOOL (circled in red in the photo below) and drag the embellishment onto your project in the bin (at the bottom of the screen). Resizing Digital Embellishments

Once you have moved the embellishment onto your project, you can resize or rotate the embellishment by clicking on the "handles" (little squares located on the dotted line surrounding your embellishment) and dragging them until your embellishment is the size you want.

Just be sure to press ENTER or click on the green check mark (circled in the photo below) when you are done moving/resizing to let PSE6 know you're ready to move onto something else. If you want to come back and move/resize some more just click on the MOVE TOOL to bring the "handles" back up.
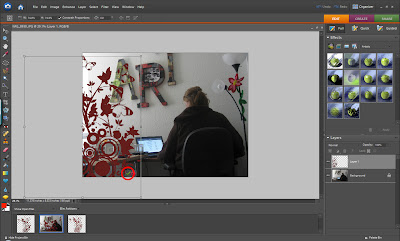
Note: I have been showing digital embellishments by Katie Pertiet, which can be purchased at Designer Digitals, in this post.

PAD 1-31-09

A super bowl sale at my favorite local scrapbook store. I dragged my ill butt out of bed early to make this one, but it was worth it.

Friday, January 30, 2009

PAD 1-30-09

I get bored really easy, so being sick is the worst. I felt well enough for a bit to move some of my art supplies to the couch.

PAD 1-29-09

My hubby works an on-call shift every three weeks. And this is his week. He has 15 minutes to respond to any pages, so we hibernate during on call weekends. The bright side is that I'm sick so we'd be hibernating this weekend anyway.

Thursday, January 29, 2009

Farktography - Rocks

Today's theme appeals to both the photographer and the geologist in me. Rocks.

Wednesday, January 28, 2009

PAD 1-28-09

Gotta love passing the flu around work...

Tuesday, January 27, 2009

PAD 1-27-09

Coming home late from work, again.

PAD 1-26-09

Working on a painting in class today.

Sunday, January 25, 2009

PAD 1-25-09

An osprey we spotted while biking today.

January Technique 2 - Color Pop

You can see the post for January Technique 1 - The Clone Tool here.

I call this technique "Color Pop", although it likely has other names as well. This technique allows you to bring color back to selected portions of black and white photos, for cool effect. I will be using this technique on my niece's eys in the following photo. Remember, you can click on any of the photos for larger, more detailed versions.
Step 1. Open your photo in photoshop (File -> Open -> browse to photo -> Open).

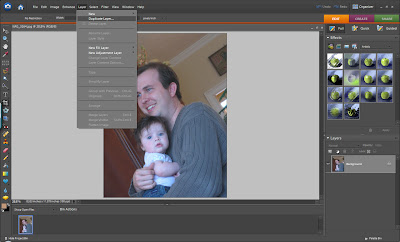
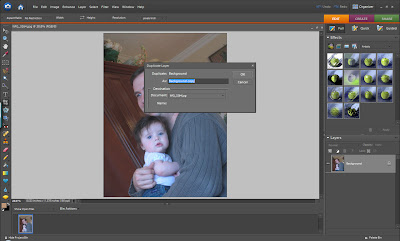
Step 2. Create a second copy of your photo in another layer by selecting Layer -> Duplicate Layer -> name your layer -> OK.

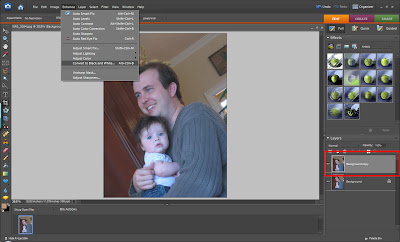
Step 3. Convert your newly created copy of your photo to black and white. Make sure the new layer is slected (see red rectangle in picture below) and then go to Enhance -> Convert to Black and White.
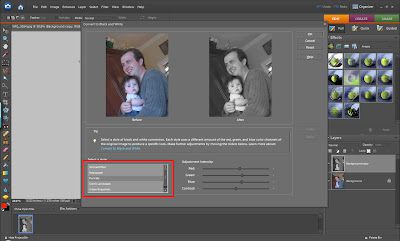
Select the type of black and white conversion you want to perform based on the type of photo you are using (see red rectangle in picture below). You can preview them all in this dialog box so try them all. I don't always like the obvious choice the best.
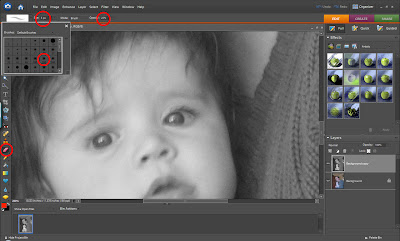
Step 3. Zoom to the area of the black and white photo where you want to add color. Then select the eraser tool. Slect the shape, size, and opacity of your eraser tool as shown in the photo below. If you are coloring an area with straight edges, choose a shape with straight edges. If you are coloring a more diffuse area, choose a shape with softer edges. The size of your eraser tool can be changed as you go, as necessary, but start with a size smaller than the area you are trying to color. Use an opacity of 100 percent if you want all of the color from the layer below to be seen. Use an opacity of less than 100 percent if you want just a "hint" of color.
Step 4. Start erasing the area you want to be colored by holding down the left mouse button and "rubbing" the mouse over the area. Erase in short strokes so that you can undo in stages, if necessary.
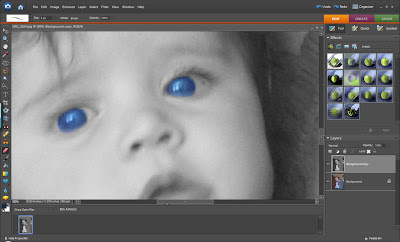
See how the surrounding black and white image really makes the color pop from the background compared to the colored original.

Here's my finished photo:
If you want the color to pop even more, you can increase the saturation of the colored layer by selecting it in the layers palette and choosing Enhance -> Adjust Color -> Adjust Hue/Saturation -> increase the saturation number in the dialog box -> OK.

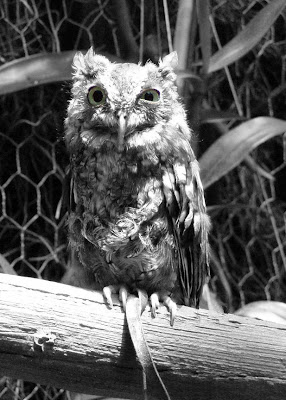
Here's another example (again, I colored the eyes):

Saturday, January 24, 2009

PAD 1-24-09

Visiting with friends from Wisconsin who are vacationing nearby.

Friday, January 23, 2009

PAD 1-23-09

Just finished reading this series. I read A LOT of books, so you're going to see a lot of pictures of books :) .
The hard back copies mean I was too impatient to wait for the paper back.

PAD Week 3 Layout

This week's layout ended up being all about the journaling.

I had kept my "I voted" sticker. Seemed the perfect place to use it.

Thursday, January 22, 2009

PAD 1-22-09

I made this "One Little Word" home decor project for a friend. Just gave it to her today and she really loved it! Look for instructions for creating a similar piece in February when I cover "Tissue Paper" techniques. (that's copper paint splatter in the background, hard to get a good photo.)

PAD Week 2 Layout

This week I used glimmer mist in my chosen January color of blue and glimmer screens to decorate my folder. I really like the effect!

I've ordered uncoated white bookbinding tape to bind my folders together. I wanted uncoated white tape so I could ink, paint, stamp, or otherwise decorate the tape. I will post instructions for binding as soon as the tape arrives.

Wednesday, January 21, 2009

Project 365 Slideshow Added

You can now access a slide show of my Project 365/Photo-a-Day photos. Just click on the link in the left side bar. Happy viewing!

PAD 1-21-09

Although I've had it for six months, it feels NEW, because today is the first day it has actually WORKED on my computer.

PAD 1-20-09

I think this may be the only inauguration I've ever watched...

PAD 1-19-09

My hubby attempting to get my computer to work with resorting to the use of a hammer.

PAD 1-18-09

Catching up from my few days of computer downtime.

I took this picture of my hubby during a bike ride at Fort De Soto park on Sunday.

I'm baaaacccckkkkkk!


Saturday, January 17, 2009

A new low...

...I'm working on a wall decor project for a friend (you'll be seeing it posted soon). I'm using a technique that involves ALOT of Mod Podge. Well, I just put the LAST layer of Mod Podge on the project and came over to my computer to surf while it dried. Fast forward 20 minutes, and I go to get up from my computer....just to discover I had MOD PODGED MYSELF TO MY MOUSE....

Now that's a new low.....

There may be a SLIGHT interuption in posting....

...for the next 2 days or so while my computer is DOWNGRADED from 64-bit Vistas to 32-bit Vistas. We are preforming this down grade in the hopes that it will make my WACOM tablet, Wishblade, and Cricut Design Studio work again. Wish us luck!

PAD 1-17-09

Just got my bike back from 2 years of storage, 1 week of tune-ups (one new tire, one new tube), and a new attitude adjustment (it is MUCH more comfortable now!).

Friday, January 16, 2009

PAD 1-16-09

Working from Home today...love that I can do that.

PAD 1-15-09 (... a tad late)

Sorry all, wasn't feeling that well last night so I never got around to posting yesterday's picture...

At first I was bummed that this photo came out a little blurry. But then I realized it was actually artistically ironic that the picture from my annual eye exam came out just a bit on the blurry side...

Wednesday, January 14, 2009

PAD 1-14-09

Got home from work a little late tonight...