Remember, you can click on any of the photos for larger, more detail versions.
Digital embellishments can be purchased at a multitude of online stores. So far, I have purchased most of my digital embellishments at Designer Digitals, but have also purchased some from Two Peas in a Bucket and Scrap Artist.
Digital embellishments generally come in two types 1) PNG files or 2) ABR files. I will be talking about PNG files in this post in ABR files in the next post.
PNG files work like any other layer in PSE6. Open them by going to FILE -> OPEN -> browse to the location of the file -> OPEN. Once open you can recolor, move, or resize your digital embellishment. These actions do not need to be completed in a specific order, you can move and resize your embellishment before you recolor it and vice versa.
Recoloring Embellishments
If the embellishment you purchased is available as both a PNG and ABR file, it is likely that the embellishment is black. To change the embellishment to white, go to ENHANCE -> ADJUST COLOR -> ADJUST HUE/SATURATION: Then adjust the "lightness" scale all the way to the right (+100):
 If you want your embellishment to be a shade of gray, choose any number between -100 and +100 on the lightness scale.
If you want your black embellishment to be a color other than a shade of gray, there are two ways to do this. The first way is to use the ABR version of the embellishment (see next technique post), the second is to use the PAINT BUCKET TOOL. If an ABR verion of the embellishment is available, I DO NOT recommend using the PAINT BUCKET TOOL to color your embellishment because you will lose some of the fine detail in your embellishment.
For example:
This is the original embellishment, notice the texture and varying opacity and shades of black within the embellishment: And this is the embellishment colored with the PAINT BUCKET TOOL, notice how much of the texture is lost:
 However, if you have an embellishment that does not include the variations in texture, opacity, and shade, such as this version of the same embellishment:
 the PAINT BUCKET TOOL will work well, here's how:
Select the color you want to color your embellishment by slecting on the FOREGROUND TOOL circled in the picture below. Then choose your color in the dialog box either by clicking on the desired color in the palette or entering RGB, HSB, or pantone values. Then select OK.
(You can also select your foreground color from a photo or another digital element by using the eye dropper tool.) Next, click on the PAINT BUCKET TOOL circled in the photo below. Then click on each part of your embellishment to color it. You may need to zoom into smaller portions of your embellishment to click on them.
 To recolor a digital embellishment once you've moved it onto a digital layout or photo, just be sure the layer that the digital embellishment is on is selected in the layers palette on the bottom right hand side of the screen.
If you have a PNG file that is pre-colored, such as this one: you can adjust the colors by going to ENHANCE -> ADJUST COLOR -> ADJUST HUE/SATURATION and adjusting the HUE scale between -180 and +180, the SATURATION scale between -100 and 100, and the LIGHTNESS scale between -100 and +100:
Moving Digital Embellishments
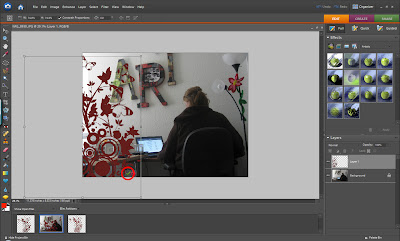
Most likely you will want to move your embellishment onto a digital photo or layout. Simply choose the MOVE TOOL (circled in red in the photo below) and drag the embellishment onto your project in the bin (at the bottom of the screen). 
 Resizing Digital Embellishments
Just be sure to press ENTER or click on the green check mark (circled in the photo below) when you are done moving/resizing to let PSE6 know you're ready to move onto something else. If you want to come back and move/resize some more just click on the MOVE TOOL to bring the "handles" back up.

Note: I have been showing digital embellishments by Katie Pertiet, which can be purchased at Designer Digitals, in this post.


0 comments:
Post a Comment