Ok, this month's technique focus is acrylic paint. Technically, this was March's technique focus, but, well, you know.....stuff gets in the way.
I'm going to start this series of technique posts with a storage/organization and equipment discussion. In this post I'll show you how I organize my painting supplies and in the next post I'll talk about what kind of paints and brushes I prefer to use.
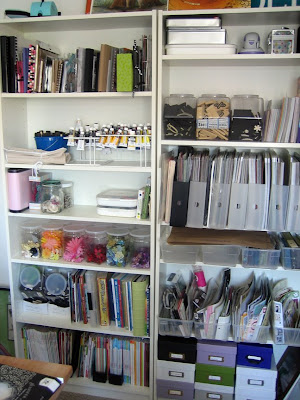
I store paint in two different places in my scrap room, depending on whether it is craft paint or artist's paint. My artist's paint I store on a bookshelf to the right of my scrap table:
 I store the paint tubes in what are supposed to be a dish stacking tiers for the kitchen. It turns out that the spaces between the wires are just perfect for holding paint tubes. I have a dinner plate sized one for my colors and a salad plate sized one for my neutrals.
I put a little dab of paint on the lid of each tube to help me locate the colors I want quicker. I find that the tube labels are often inaccurate.
 You can see that this method holds both large and small tubes, and tubes from different manufacturers (I have some Golden paint tubes in my neutrals set, LOVE their copper!).
 I store my craft paint on the bookshelves behind my chair:
 I use black paperboard boxes meant for CD's. I have one for all my Tim Holtz paints. This method allows me to store the bottles upside down, as Tim recommends.
 And I have one for all my miscellaneous craft paints.
 Finally, my paint palette pretty much lives on my desk with me. That way, even when I'm not painting, I can use it to wipe excess glue onto, test inks, etc. I use a cheap ($5) silicon baking mat that I bought at Target. The trick is to find a smooth one, a textured one won't let go of dried paint as easily. Notice, the paint peels right off once dry (except Tim's paint, they flake when they dry).
 You can see that this method holds both large and small tubes, and tubes from different manufacturers (I have some Golden paint tubes in my neutrals set, LOVE their copper!).
 I store my craft paint on the bookshelves behind my chair:
 I use black paperboard boxes meant for CD's. I have one for all my Tim Holtz paints. This method allows me to store the bottles upside down, as Tim recommends.
 And I have one for all my miscellaneous craft paints.
Now, if you look on the shelf with my artist's paints, you'll notice my brush collection. I have a bucket stuffed full of foam brushes and a canvas roll-up brush holder for my "real" brushes. I simply store these on the shelf with my artist's paints.
I'll talk about why I like foam brushes in my next post.
 Finally, my paint palette pretty much lives on my desk with me. That way, even when I'm not painting, I can use it to wipe excess glue onto, test inks, etc. I use a cheap ($5) silicon baking mat that I bought at Target. The trick is to find a smooth one, a textured one won't let go of dried paint as easily. Notice, the paint peels right off once dry (except Tim's paint, they flake when they dry).
Since this is a baking mat, you can also throw it in the dishwasher! How convenient! It also provides a great mixing surface.


1 comments:
I love your idea for the tube paint holder.
Post a Comment