


Ok, with the popularity of Project 365, I've seen date/day of the week digital journaling overlays popping up everywhere. But I haven't necessarily found any I love, and I like to have lots of different ones so I'm not using the same ones over and over again. Well, it turns out they are pretty easy to create.
Step 1 - Create a New File. Go to FILE -> NEW -> BLANK FILE.
 In the dialog box do the following:
- name your file (optional)
- set the width to 6 inches
- set the height to 4 inches
- set the resolution to 1200 pixels per inch
- set the background contents to tranparent
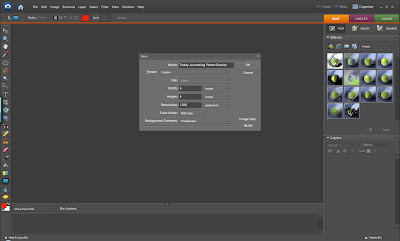 These settings will allow you to resize the overlay you are creating, up to 12x12 inches, with adequate resolution for photo quality printing.
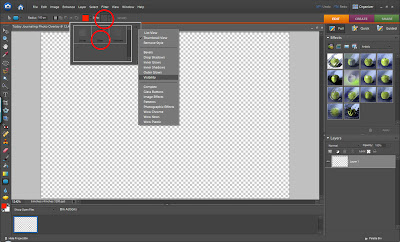
 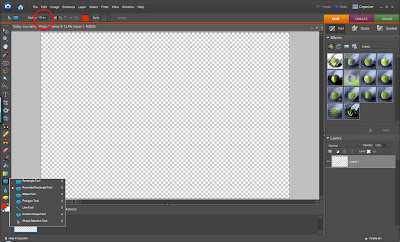 In the tool options at the top of your screen, select STYLE and then click on the arrows at the top right hand corner of the dialog box. From the drop down list choose VISIBILITY and then select HIDE from the dialog box. This option will allow us to create an outline of a rounded rectangle instead of a filled in rectangle.
 Drag your rounded rectangle to a size slightly smaller than your background. Don't worry about the color of the rectangle yet. Next, press and hold CONTROL and click on the layer containing your shape in the Layers Palette (bottom right hand corner of screen). This will select the objects in that layer.
 In the dialog box do the following:
- name your file (optional)
- set the width to 6 inches
- set the height to 4 inches
- set the resolution to 1200 pixels per inch
- set the background contents to tranparent
 These settings will allow you to resize the overlay you are creating, up to 12x12 inches, with adequate resolution for photo quality printing.
 Step 2 - Draw Your Overlay. Click on the SHAPE TOOL (see photo below) and select the ROUNDED RECTANGLE TOOL. In the tool options at the top of your screen, select a radius for your rounded corners, I am using 100 pixels.
 In the tool options at the top of your screen, select STYLE and then click on the arrows at the top right hand corner of the dialog box. From the drop down list choose VISIBILITY and then select HIDE from the dialog box. This option will allow us to create an outline of a rounded rectangle instead of a filled in rectangle.
 Drag your rounded rectangle to a size slightly smaller than your background. Don't worry about the color of the rectangle yet. Next, press and hold CONTROL and click on the layer containing your shape in the Layers Palette (bottom right hand corner of screen). This will select the objects in that layer.
 Now, while your shape is selected, create a new layer by clicking on LAYER -> NEW -> LAYER. Name the new layer if you want and then click OK in the dialog box. The first layer holds a hidden image of your shape. We will actually be creating your shape in this new layer.
 Your shape should still be selected. Choose EDIT -> STROKE (OUTLINE SELECTION).

 Repeat the steps above using other shapes and text as desired. You do not need to create a hidden image or use the STROKE command on text. Those steps are only necessary when you want to create an outline of a shape.
 Once your are happy with the overlay, SAVE your overlay as a PSD file so you can come back and modify it in the future if you want. Once your overlay is saved merge all of the layers into one by clicking LAYER -> MERGE VISIBLE. Save the resulting overlay as a PNG file by clicking FILE -> SAVE AS and the selecting PNG under format.
Your resulting PNG file can be used as any other PNG file. I describe some of the things you can do with PNG files in Digital Embellishment Basics.
Here's what my overlay looks like recolored and on a photo.
 Keep in mind that I like to create high resolution overlays so that I can use them on photos/layouts up to 12x12 inches in size. So, you may need to reduce the resolution of the overlay before you move it onto a 4x6 photo, or else you probably won't even see it because it will be so much larger than the photo.
Happy overlay making!

5 comments:
Thanks so much for this great step by step tutorial. I've thought about this for quite a while as I work my way thru learning digital skills. Somehow I thought this might be a skill I"d like to know.
Bless you Amanda! My wish was granted. ;-)
I'm gonna try it tomorrow as I need natural light for serious computer work.
Your blog is fantastic! Thanks for sharing with us. I am just working through the overlay as like you I want to make my own overlay to say what I want it to say! I am hooked on your site now!
Gill
Wow, this is so helpful, just what I have been looking for. Thanks a TON!!
Sarah
I have been working on drawing some photos as overlays in photoshop 9 and I want to be able to let people downlaod them and use them for their own blog. I was wondering if might know a few tips for this? For example: should I use a file hosting site? Do I leave for download as a photoshop file? Any help would be greatly appreciated! Thanks for this tutoril!
lindsay
098585c@acadiau.ca
Thanks for the helpful tutorial. If I created something like this and wanted to post it on my website as a freebie, how would I do that. I would want it to be transparent like you made it. Thanks so much
Post a Comment